Master The Art Of Drawing Roses: A Beginner's Guide
Embarking on the journey of learning how to draw a rose can be an exhilarating experience for both hobbyists and aspiring artists. Whether you're starting from scratch or have some prior sketching experience, creating a captivating rose drawing is well within your grasp. This comprehensive guide will walk you through the fundamentals of drawing roses step by step, ensuring your artwork is both effortless and breathtaking.
Many individuals feel intimidated by the prospect of drawing flowers, particularly roses, due to their complex details. However, with the appropriate techniques and tools, anyone can excel in the art of drawing roses. This guide for beginners is crafted to simplify the process, making it engaging and enjoyable, even for those new to the world of art.
By following this guide, you will acquire the essential skills required to create stunning rose drawings that you can take pride in. Let's delve into the realm of art and uncover just how effortless it is to infuse beauty onto paper!
Read also:Why You Should Join Wewillwritecom Today Unlock Your Writing Potential
Table of Contents
- Discovering the Allure of Roses
- Essential Tools for Your Artistic Journey
- Understanding the Structure of a Rose
- Step-by-Step Guide to Drawing a Rose
- Helpful Tips for Beginners
- Common Pitfalls to Avoid
- Exploring Various Artistic Styles
- Bringing Your Rose to Life with Color
- Perfecting Your Skills Through Practice
- Conclusion
Discovering the Allure of Roses
Roses have long been celebrated as one of the most iconic flowers globally, symbolizing love, beauty, and elegance. With their diverse array of colors and forms, roses naturally appeal to artists of all skill levels. Drawing a rose is not merely an exercise in creativity; it is also a profound way to connect with nature and appreciate its inherent splendor.
Learning how to draw a rose is a deeply gratifying endeavor. It empowers you to capture the intricate nuances of the flower and breathe life into it on paper. This guide will focus on creating striking yet accessible rose drawings tailored for beginners, ensuring you can achieve impressive results.
Essential Tools for Your Artistic Journey
Before embarking on your drawing journey, it is crucial to gather the right tools. Here is a list of essential items you will need:
- Pencils (HB, 2B, 4B, 6B)
- Eraser
- Sketchbook or drawing paper
- Blending stumps or tortillons
- Colored pencils or markers (optional)
These tools will assist you in creating smooth lines and shading, enabling you to add depth and texture to your rose drawing, thereby enhancing its overall appeal.
Understanding the Structure of a Rose
To craft a realistic rose, it is imperative to understand its anatomy. A rose comprises several key parts, including:
- Petals: The most defining feature of the rose, arranged in multiple layers.
- Stem: The central support structure of the flower.
- Leaves: Positioned in clusters along the stem, providing additional detail.
- Thorns: Adding texture and authenticity to the stem.
By examining these components closely, you will be better equipped to produce a more accurate and visually captivating rose drawing.
Read also:Adalberto Martiacutenez Resortes A Celebrated Icon In Mexican Comedy
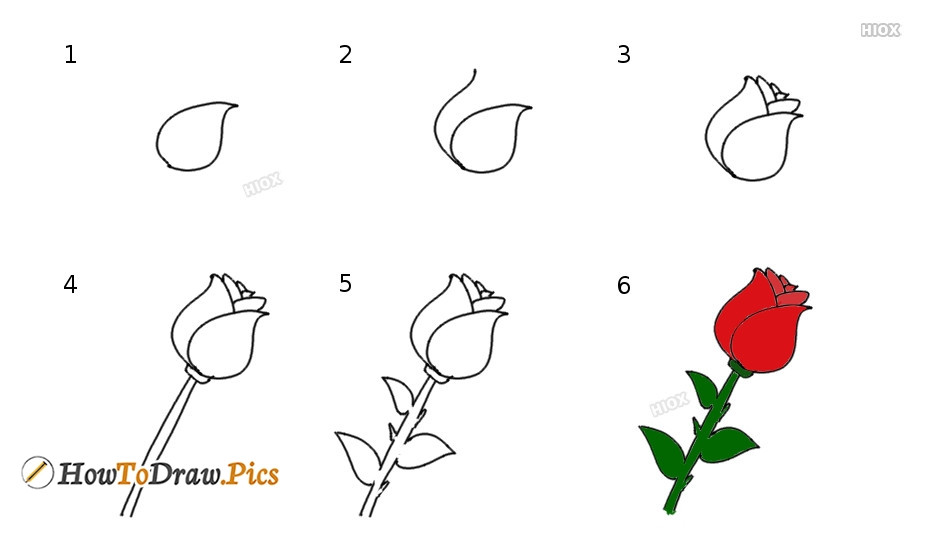
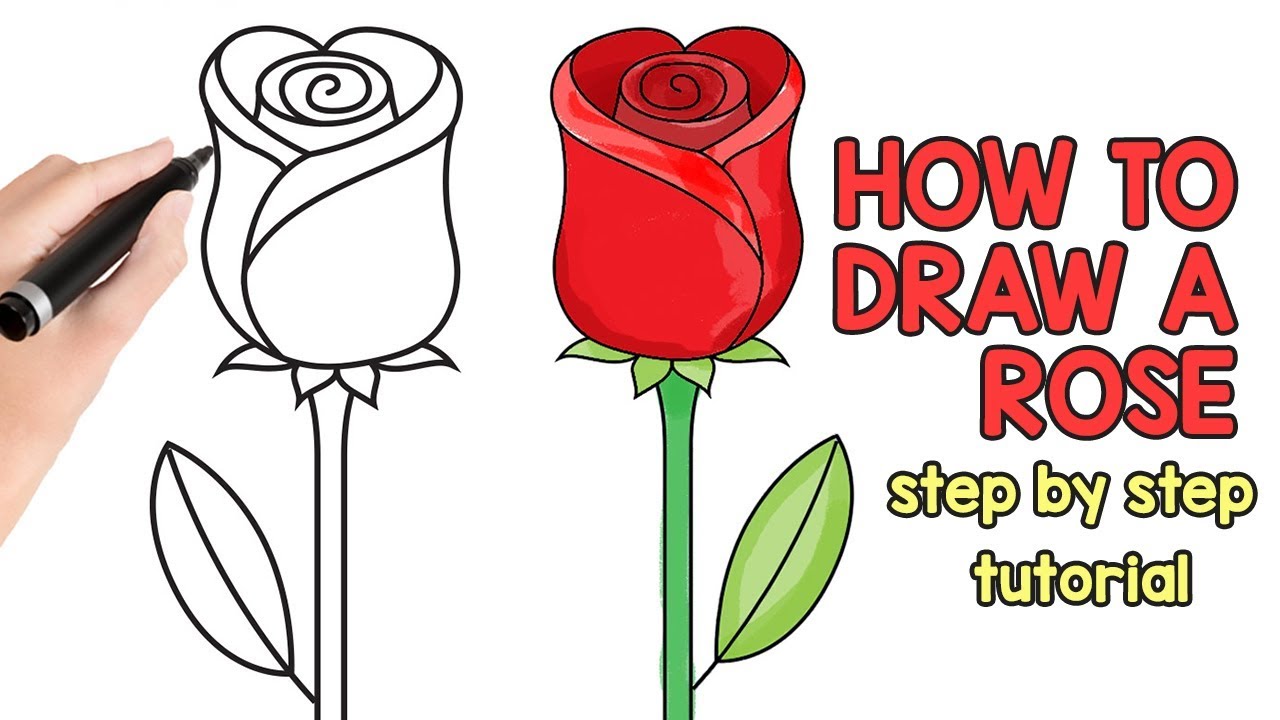
Step-by-Step Guide to Drawing a Rose
Step 1: Establishing the Basic Outline
Initiate your drawing by sketching the fundamental outline of the rose. Begin with a basic circle to represent the center of the flower and incorporate a few curved lines to outline the outer petals. This foundational structure will serve as the framework for your drawing.
Step 2: Layering the Petals
Once the basic outline is in place, proceed to add petals layer by layer. Start with the innermost petals and progressively work outward. Pay close attention to the curves and folds of each petal to achieve a lifelike appearance.
Step 3: Adding Details and Texture
Now is the time to incorporate details and texture into your rose. Utilize shading techniques to amplify the depth of the petals, creating a three-dimensional effect. Be sure to include thorns and leaves on the stem for a comprehensive and polished look.
Helpful Tips for Beginners
Here are some valuable tips to enhance your rose drawing abilities:
- Engage in regular practice to develop muscle memory and refine your technique.
- Study real roses or photographs to gain a deeper understanding of their structure.
- Commence with light strokes and gradually increase pressure for darker lines.
- Experiment with various shading methods to identify what suits your style best.
Common Pitfalls to Avoid
When drawing roses, there are several common errors to be mindful of:
- Making petals too uniform in size and shape, which can appear unnatural.
- Overlooking the natural curves and folds of the petals.
- Over-shading, which can flatten the drawing and diminish its depth.
- Ignoring the details of the stem and leaves, which are crucial for realism.
Exploring Various Artistic Styles
Rose drawings can be executed in a multitude of styles, ranging from realistic to abstract. Exploring different styles can help you discover your unique artistic voice. Some popular styles include:
- Realistic: Focusing on precise details and textures to replicate the flower's true form.
- Abstract: Emphasizing shapes and colors rather than realism for a more interpretive approach.
- Cartoonish: Simplifying the rose's features for a whimsical and playful aesthetic.
Bringing Your Rose to Life with Color
Introducing color to your rose drawing can elevate its impact. Here are some tips for coloring your rose:
- Select complementary colors, such as red and green, for a classic and harmonious rose.
- Layer colors to create depth and dimension, enhancing the rose's overall appearance.
- Employ light and dark shades to accentuate the rose's texture and realism, making it more visually striking.
Perfecting Your Skills Through Practice
Like any skill, drawing demands consistent practice to improve. Dedicate time each day to work on your rose drawings. As you practice, you will notice significant advancements in your technique and confidence. Remember, the secret to success lies in persistence and a desire to learn.
Conclusion
Creating a stunning and approachable rose drawing is an attainable goal for beginners. By following this guide, you have learned the fundamentals of rose anatomy, essential tools, and step-by-step techniques to bring your artwork to life. Embrace regular practice and experimentation with diverse styles to uncover your unique artistic expression.
We encourage you to showcase your rose drawings in the comments below or explore additional articles on our site for further artistic inspiration. Happy drawing!
For additional reading and inspiration, consider these trusted resources:

